When inventor and software developer Hendrik Beijeman travelled to Namibia in 2016, he was excited at the prospect of imaging the heart of the Milky Way and Southern Hemisphere nebulae under a dark, pristine sky. He prepared for hours and spent every available night engaged in astrophotography, saving the imaging processing for when he returned to his home in the Netherlands. Imagine his disappointment, then, at discovering half of his hardearned images showed trails rather than pin-point stars. Instead of abandoning his hobby, Beijeman resolved to apply his skills to developing a fully automated auto-guiding system and a better way to polar align. Thus, Project StarAid was born and the StarAid Revolution reviewed here is the culmination of that dream.
First impressions
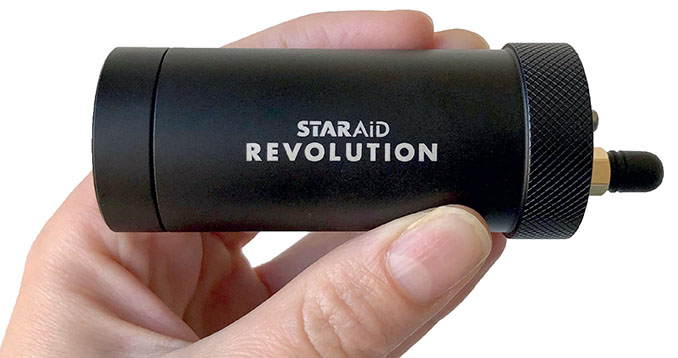
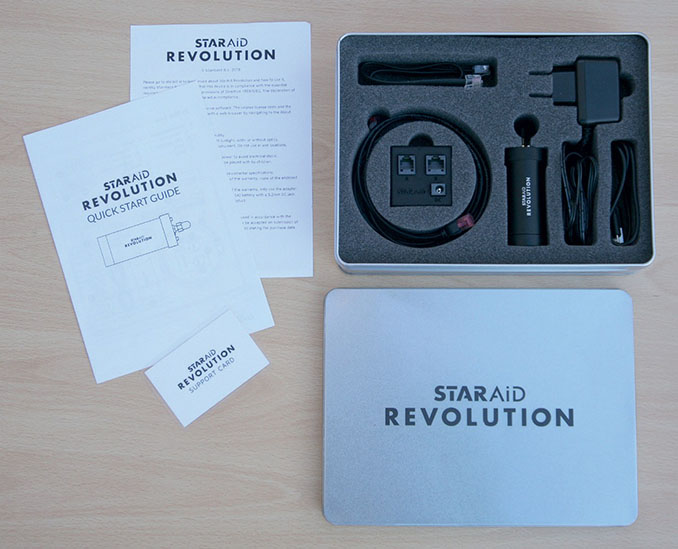
The StarAid Revolution arrives at your door in an attractive 25 × 19 × 6 centimetre presentation tin emblazoned with the product’s name and which provides secure storage for your device when not in use. The hardware consists of the StarAid Revolution and its 240V mains power adaptor, a two-metrelong RJ-45 to RJ-45 ethernet cable connecting the StarAid to a 48 × 48 × 20 millimetre splitter box, and a 50-centimetre-long RJ-11 to RJ-11 guide cable connecting the splitter box to your mount. There is also a 50-centimetre-long USB-A to Micro-USB cable for software updates to the StarAid Revolution.
The documentation includes a four-sided A5 quick start guide and a credit card-sized laminated support card. The quick start guide offers an illustrated step-by-step process for connecting and starting up your StarAid Revolution, with links to staraid.ai/support/ faq/ should you get stuck. Given that bSentient B. V. is a Dutch company, the mains adaptor supplied has a European-style connector. Fortunately, I was able to source an EU–UK adaptor from a friend that enabled me to get up and running indoors.
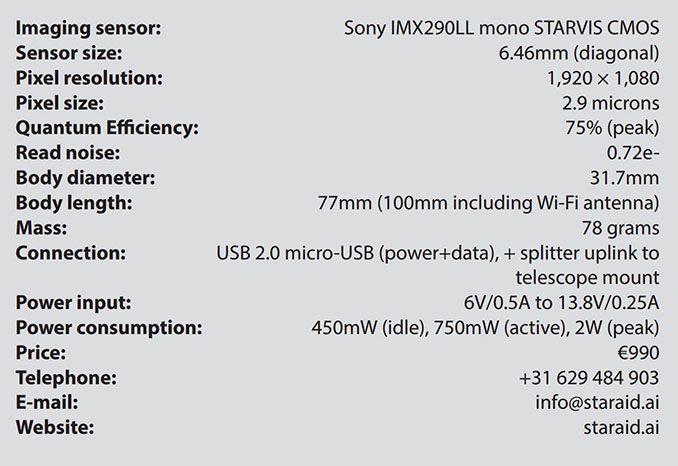
For outdoor tests, I learned from the online FAQ that the splitter box has a standard 5.2mm DC jack that can operate from 6V/0.5A to 13.8V/0.25A, so I used a battery pack of 8 × 1.5V alkaline D-cells to power the device satisfactorily throughout all subsequent testing. According to the specifications, StarAid draws 450mW when idle and 750mW when active, rising to a peak of two watts. Whatever power supply you use, from 6V to 13.8V, you should ensure that it’s regulated and rated for a 400mA continuous load.
As soon as power is applied to the StarAid, it boots-up an embedded, custom computer and you see activity on the two multi-colour LEDs situated on the rear of the unit. Once start-up is complete (between 10 and 15 seconds), LED2 pulses yellow. You soon learn what the device is doing from the coloured patterns LED1 and LED2 make. StarAid is configured to automatically calibrate your mount if it detects it’s connected to an ST-4 port, and then it starts autonomous autoguiding. However, you can optimise a few settings by either connecting the StarAid to your laptop via the supplied short USB 2.0 cable, or you can connect to the Wi-Fi network that the device creates.
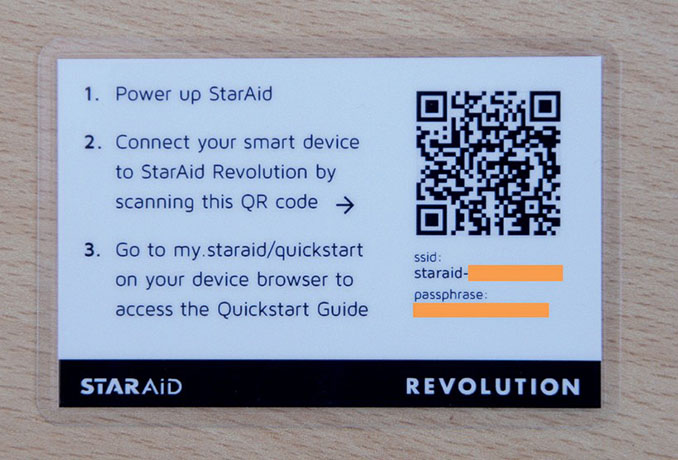
If you have a recent Android or iOS smartphone, you can simply point its camera to the QR code on the laminated support card and you’re instantly connected to StarAid’s wireless network with a pregenerated passphrase (one that is secure, I hasten to add, if you keep the support card safe!) and taken to the StarAid App configuration window. This is all done automatically and is a very clever and well-thought-out approach for anyone who is technically challenged, so the developer should be heartily applauded. It worked flawlessly with both my iOS 13.3 iPhone SE and Android 7.0 Motorola G4 phones.
StarAid App and guidescope
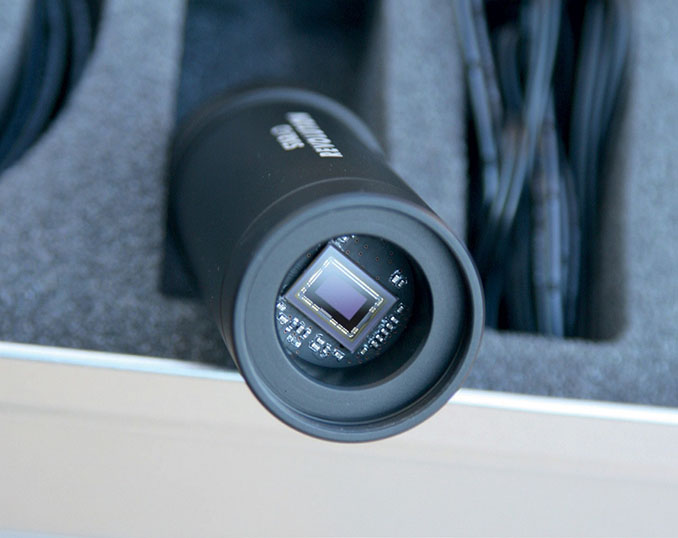
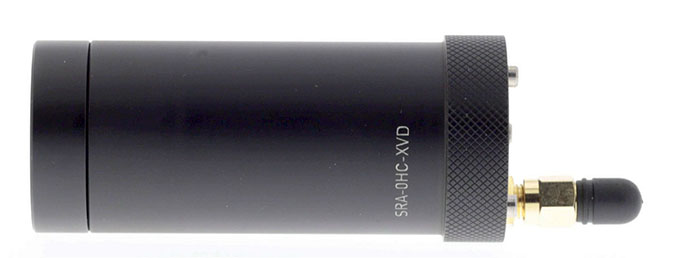
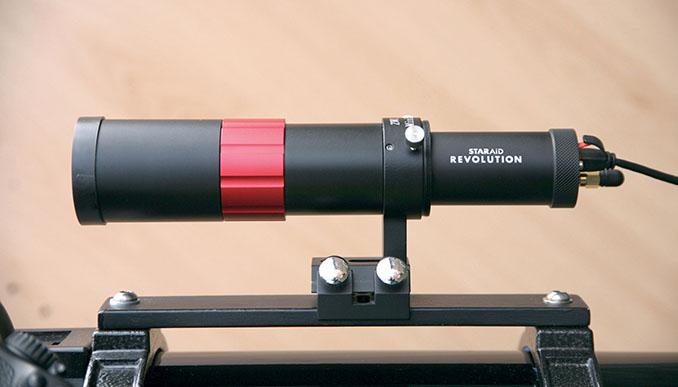
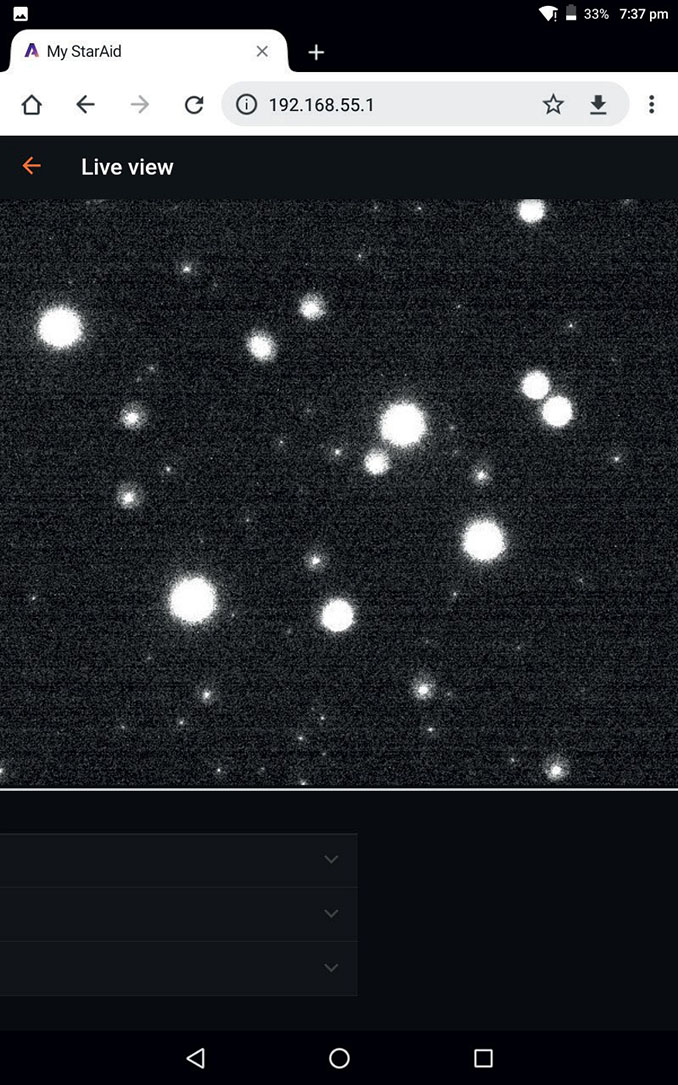
The StarAid App’s home screen has four largely self-explanatory options labelled ‘Autoguiding’, ‘Polar alignment’, ‘Live view’ and ‘Sky Recognition’ (platesolving). Live view gives you a realtime view of what the device’s Sony IMX290LL monochrome sensor is seeing, which is essential the first time you attempt to focus it. This is a good juncture to mention that the manufacturer recommends an optimal focal length of 100 to 150mm for your guidescope. Since the StarAid Revolution is just 77mm long (100mm if you include its Wi-Fi antenna) and possesses a barrel diameter of 31.7mm (1.25-inch), I used a ZWO Mini Guide Scope, which has a focal length of 120mm. The StarAid Revolution possesses front threads for 1.25-inch filters, but a C/CS-mount might be a better option for compatibility with, say, the QHY Mini Guide Scope and its clones.
The Sony IMX290LL mono CMOS sensor within the device measures 6.46mm across the diagonal, hence StarAid’s field of view with a ZWO Mini Guide Scope is slightly more than three degrees. Given that the sensor has a pixel resolution of 1,920 × 1,080, the pixel size is 2.9 microns. This means that the StarAid’s resolution with the reviewed guidescope was almost five arcseconds per pixel. The StarAid App’s settings for ‘Live view’ permit you to adjust the image quality and even download the sensor output as a FITS raw file.
I’ll cover the app’s other main menu options presently, but under the general setting tab you can set your geolocation (with a surprisingly comprehensive built-in gazetteer; no Internet required!), date/time, LED brightness, mount type (generic ST-4 or Losmandy DDS) and guidescope optics (it determined that my ZWO Mini Guide Scope has an actual focal length of 121.4mm).
Auto-guiding with the StarAid Revolution
For the purposes of this review, which I conducted in December 2019, I used StarAid running v1.2.3 software with a vintage Celestron 140mm, f/3.6 Schmidt–Newtonian ‘Comet Catcher’ of 510mm focal length on an iOptron CEM25P equatorial mount. The camera was a Canon 550D DSLR with an 18 megapixel APS-C (22.3 × 14.9mm) CMOS sensor at ISO 800. Since the 550D has a pixel size of 4.3 microns, the resolution at the Comet Catcher’s Newtonian focus was 1.74 arcseconds per pixel. For my initial tests I balanced and polar aligned the iOptron equatorial mount in my usual way to an accuracy of around three arcminutes (one-twentieth of a degree).
Without any configuration of the StarAid App other than to enter geolocation data (a one-time operation, unless you observe from different locations) and to specify the mount type, the device flawlessly self-calibrated the iOptron CEM25P’s auto-guide port. Whenever I commanded the mount to GoTo a different celestial object, the StarAid Revolution unfailingly resumed autonomous autoguiding. I obtained perfectly tracked six-minute subs with my Comet Catcher and 550D DSLR.
Out of a desire to fool the device, I deliberately unbalanced the Comet Catcher and the camera about the declination axis, making the instrument substantially front heavy. At this point, StarAid did get slightly confused and a runaway declination drift ensued. However, when I visited the settings menu of the StarAid App and selected ‘Legacy’ rather than ‘Smart’ auto-guiding, the device was able to resume control of the situation and accurately guided my unbalanced telescope.
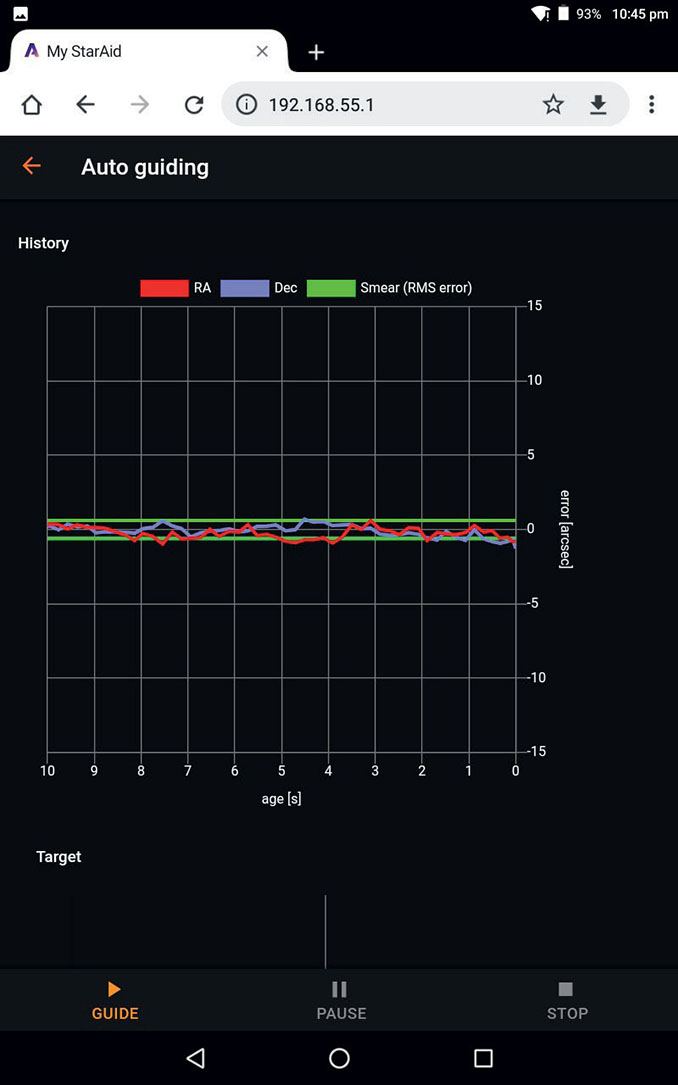
While I was able to prove to my satisfaction that StarAid can autonomously auto-guide, the app also permits you to monitor its real-time performance wirelessly on your smartphone or tablet in terms of the corrections applied to both the right ascension and declination axes as a time-plot graph of age versus correction error in arcseconds, or a scatter-plot polar graph. You can also specify the recording time.
Polar alignment with the StarAid Revolution
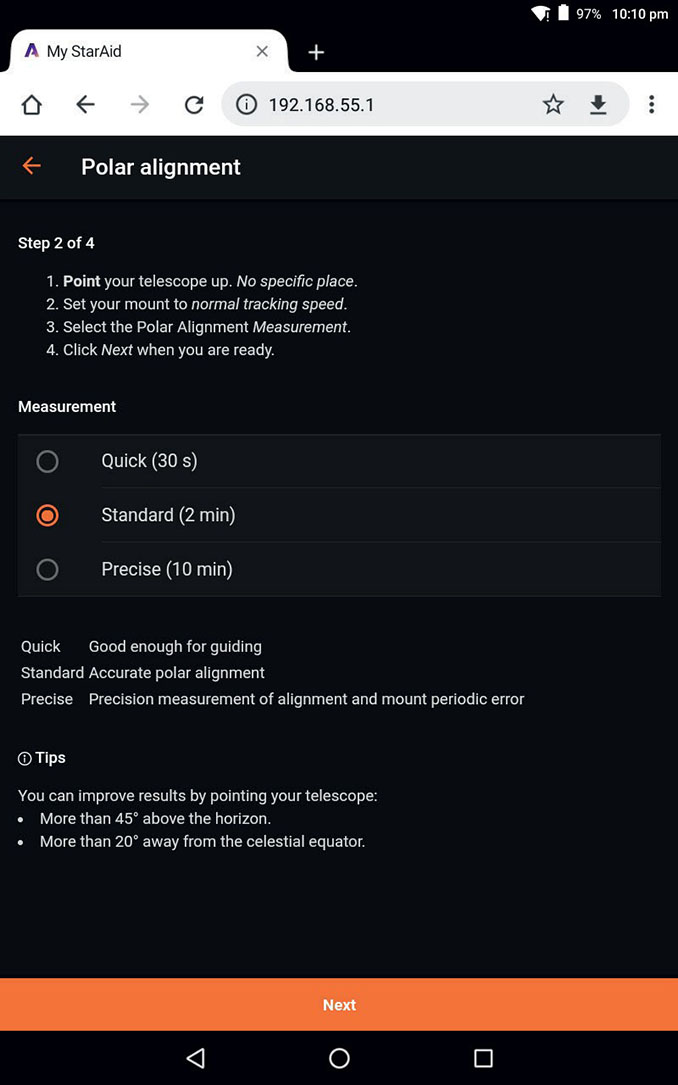
An essential prerequisite to good tracking performance, and not to overtax your autoguider, is to first polar align your equatorial mount as accurately as you can. As is typical of a number of portable GoTo mounts designed for imagers, my iOptron CEM25P has a built-in illuminated polaralignment telescope with a finely graduated reticle permitting you to set the offset of Polaris from the north celestial pole for any given date and time. With a little practice, it’s not difficult to point the mount’s polar axis to within 1.5 arcminutes of the north celestial pole. But what if you observe from a Northern Hemisphere location where Polaris is hidden behind a tree or house? Or the Southern Hemisphere where there is no correspondingly bright south polar star? One of the great strengths of StarAid’s polar-alignment routine is that you don’t need to be able to see either celestial pole.
The night that I had set aside for polar-aligning my iOptron CEM25P equatorial mount solely using StarAid coincided with an eight-day-old waxing gibbous Moon, so the lunar glow afforded a good test of the device under bright-sky conditions. As expected, the device took longer to get its bearings, owing to the fainter field stars being drowned out. I positioned the CEM25P by eye, guessing that its polar axis was within a couple of degrees of the north celestial pole.
StarAid’s polar-alignment procedure consists of setting the mount to track at the sidereal rate, pointing the telescope anywhere in the sky (but preferably at an altitude greater than 45 degrees and more than 20 degrees from the celestial equator) and selecting one of three measurement periods: ‘Quick’, ‘Standard’ or ‘Precise’ (30 seconds, two minutes and 10 minutes, respectively). StarAid claim that Quick is adequate for guiding and Standard results in accurate polar alignment, but Precise determines precision-alignment measurement and the mount’s periodic error. Once you have selected a measurement period, StarAid first recognises the area of the sky that the telescope is pointed at, then proceeds to measure the star drift, eventually announcing the polar axis alignment error in degrees, minutes and seconds.
Clicking ‘Next’ in the app shows a simple polar graph plot of the corrections that you have to make to the mount’s altitude and azimuth adjusters in order to converge its polar axis with the celestial pole. Selecting first your azimuth or altitude axis for adjustment, a blue dot moves in real-time until you reach the centre of the crosswires – it’s that easy! In my tests under a moonlit and light-polluted suburban sky, I found that it was only the 10-minute Precise measurement option that provided a rapid convergence, but I was able to align within an arcminute of the true pole. When I compared this against my conventional illuminated reticle method, the difference between the two approaches was fractionally more than an arcminute, but nevertheless impressive.
Plate-solving with the StarAid Revolution
Sky recognition, or plate-solving, is the process of determining where a telescope/guidescope is actually pointed compared to where the mount’s GoTo system thinks it’s aimed. This is useful when initiating precise GoTo procedures to an object that may be too faint to see on a DSLR’s ‘LiveView’ screen, or when the field of view of the camera is small and you don’t want to miss your target. In the Sky Recognition screen of StarAid’s App, pressing the ‘Recognise’ button displays the right ascension and declination of where the guidescope is currently pointing, the constellation it’s in and the equivalent horizontal coordinates of altitude and azimuth. It also displays the guidescope’s focal length and resolution in arcseconds per pixel. I tried to confuse the device by plate-solving rich Milky Way star-fields in Cygnus and the sparse regions of Lynx, but it always knew where it was pointed. Note that the StarAid uses a built-in star database to plate-solve, meaning that it doesn’t need to be connected to the Internet.
Conclusions
This year is going to be an interesting one for astrophotographers seeking a one-stop solution for their autoguiding, polar-alignment and platesolving requirements. StellarMate already has beta builds for StellarMate OS on the powerful Raspberry Pi 4, with its high-speed USB 3.0 ports; ZWO is releasing the ASIair PRO for ASI cameras and DSLRs; and Lacerta will launch it’s M-GEN v3 stand-alone autoguider with one-button quick-start multi-star guiding. However, the StarAid Revolution is the only plug-and-play solution that delivers autonomous autoguiding and the ability to resume unattended guiding after repositioning the telescope or when clouds part – and that’s without considering its other desirable features.
On the negative side, the StarAid Revolution cannot presently control your camera, dither, or perform GoTo operations with your mount, features that are already present in the alternative solutions mentioned above. Consider this: if you already own an autoguiding camera, possess a natural aptitude for computing, and enjoy assembling hardware and configuring software, then you can create a working system considerably cheaper than StarAid – but it will not self-configure, be as easy to use or work straight out of the box.
In a world of climate change and growing light pollution, where observers are having to travel further to find darker and clearer skies, I believe that many astrophotographers will pay for a product that significantly reduces the amount of hardware they have to take into the field, and which facilitates faster set-up and to start imaging sooner, guiding autonomously and with greater accuracy. When clear skies are at a premium, you need to make the most of every astro-imaging minute. The StarAid Revelation lives up to its name by doing exactly what it says on the tin.
At a glance
Ade Ashford has travelled the globe writing about astronomy and telescopes, serving on the staff of astronomy magazines on both sides of the Atlantic. His first Astronomy Now review appeared over a quarter of a century ago.